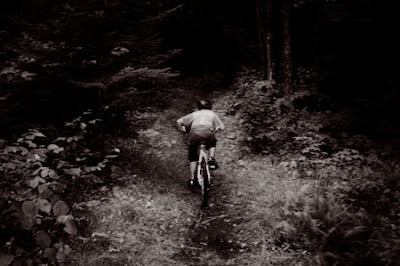
The Bikepath - Original Image
This brief piece addresses one way to take a standard image and crate a dreamlike effect from it. There are many options for doing this I chose this because it is consistent with my own style. The software used for this process is Photoshop CS.
 It's important to note that each of these images could stand on its own. Since I am moving in a specific direction, the end result will be 2-3 stock images and one gallery-bound image. The original image above is a quality image to begin with. This is important because you can't take a poor quality image with no visual appeal and turn it into a gallery-quality image no matter how many tricks you employ.
Step two is a desaturation of the image and then the addition of one single brown tone to create a toned effect. (duo tone filter) Generally, adding a second tone also darkens the image and may require you to use your curves tool or brightness and contrast tools to lighten the image back up before you move on.
 In the next step we will add some colors back into the image using the history brush. In order to use the history brush we must restore the mode to RGB - otherwise the software will indicate that you cannot restore the history on the image.
Since the rider is the principle focal point of the image this is where we first work on restoration. The history brush allows one to determine how much of the color to add back into the image from 1% - 100%. If color was a critical component of the image, I might go for the entire 100% but I'm seeking to create a dreamlike effect so I set the history bruch to restore 10% of the color (with each pass). The image at right is restored to about 40% of its original color.

Next I restore about 20% of the color to the surrounding background. This results in an image similar to the original but muted by the preceeding processes.
Finally. I want to soften the focus on everything except the rider and his bike. There are numerous ways to do this but I prefer to apply a vignette effect. Copying the image into 3 separate layer . Applying a light gausian blur to the middle layer and using the lasso tool to draw a boundary around the bike and rider. At this point I also apply a feathering effect so that the border between what is sharp and what is soft focus will not be too stark. After all, we are not trying to hide the fact that the image has been manipulated but we are trying to create a dreamlike effect where the viewer is not distracted by the obvious nature of the manipulation.
The final product entitled "Dreams of the Trail" is seen below and is available for purchase as cards or a matted or framed print at my Red Bubble Gallery.

Order "Dreams of the Trail"


No comments:
Post a Comment